Vise-Grip Fly Tying Vise

They say necessity is the Mother of invention. No argument there. Filling a need with the resources at hand is a time honored skill. Call it ingenuity. Call it McGyvering. Its a desirable attribute.

A Vise-Grip converted into a Fly Tying vise

Recent my friend Phil, who now resides in the hillsides of northern California, sent me a photograph of a fly tying vise made from a small  Vise-Grip. Nice.

Yes, in this life its  all about mind over matter. Phil and his friend Paulo welded a Vise-Grip to a post and a base. Bingo, new tool.

Sturdy, inexpensive, and very versatile, this is an effective fly vise born out of that precious process we call creativity.

Posted in Flies and Fly Tying, Gear, On the Road | Leave a comment

Installing a Scotty Flush Mount on your Adios: Part 3

The rest is pretty easy. Pull up the tape. Apply a base of chalk if you like; I don’t. Insert the mount, but before you rivet it down, note the “Inboard” arrow on the top side of the mount. It is usually best to heed that arrow. Why?  This arrow points to the direction from which devices must enter and exit the mount. Having the arrow face inboard makes things a tad easier and perhaps safer. You decide.

Scotty Fly Rod Holder_20131203_2733 copy

Rod Holder & Extension Arm in a Scotty Flush Mount


For the record, let me state a few final things that should be obvious. Only pick locations where the mount can sit perfectly flat to the deck. You need at least a 1 3/4″ void under the deck to accomodate the mount. And lastly, avoid any position where you might harm the structural integrity of the boat. For instance, I would not install one in the cockpit areas, or close to any of the four large handles on the deck. Enjoy your Scotty Flush Mount!


Posted in Diablo Adios & Chupacabra, Gear | Leave a comment

Installing a Scotty Flush Mount on your Diablo Adios: Part 2

After determining where to install the flush mount, I put down painter’s tape. The tape allowed me to mark the location of the mount, and the holes. You can flip the mount over, and use it a template. Scribe around it with a pencil, and then draw two diagonals . Where they intersect is the center of the 1 3/8″ hole.

The arrow points to the center of the 1 3/8" hole

The arrow points to the center of the 1 3/8″ hole


I couldn’t find a fine toothed hole saw. But one I had did the trick, although it left a bur around the hole. I cleaned it off with a knife. The 1 3/8″ hole saw had an outside diameter of 1.35″ exactly like the mount’s well. So a tight fit was assured. If you can’t get a tight fit, you may want to apply a layer of chalk under the mount before you secure it down.

To assist the hole saw, I first drilled a small 7/64″ pilot hole. Best to go slow with the hole saw and not apply heavy down pressure. Take your time. Once you finish the hole, marking the 4 holes for the rivets is a piece of cake. These holes need to be 3/16″, but starting with a small pilot is not a bad idea.

Holes drilled

Holes drilled


Posted in Diablo Adios & Chupacabra, Gear | Leave a comment

Installing a Scotty Flush Mount on your Diablo Adios: Part 1

Scotty Flush Mounts are very popular with kayakers. They employ them to attach rod holders and other devices, including electronics. These mounts are inexpensive, and provide a fast, convenient anchor point. Furthermore they allow you to swivel objects 360 degrees to meet your specific needs. Nice.

Scotty Flush Mount_20131128_2726

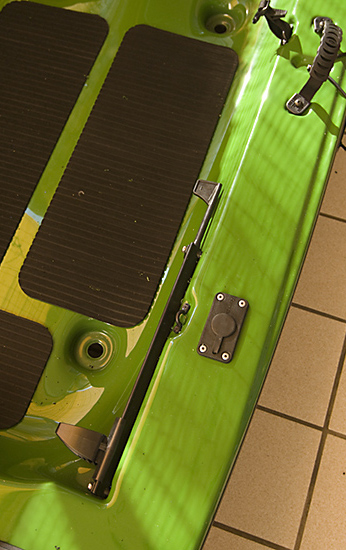
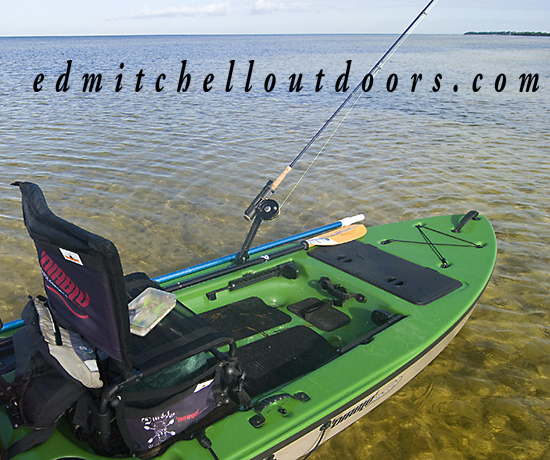
I put a Scotty Flush mount on the gunnel

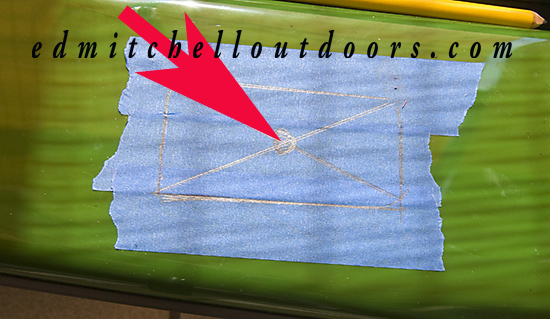
Installing one is not rocket science, but it pays to think things through. First you have to decide exactly where the mount belongs. ( Part 3 mentions places to avoid)  As you can see in this photograph, I installed one in the gunnel, near the foot pegs. I use it to anchor a Scotty Fly Rod Holder attached to an extension arm. This places the rod roughly 18 ” above the cockpit floor, making it convenient to reach either while seated or standing. Later I’ll show how this looks.

My mount is on the left side since I’m a lefty, and far enough forward that when in use it does not hinder with entering or exiting the kayak. Also note that there is enough room on the far side of the mount for a paddle shaft to pass by.

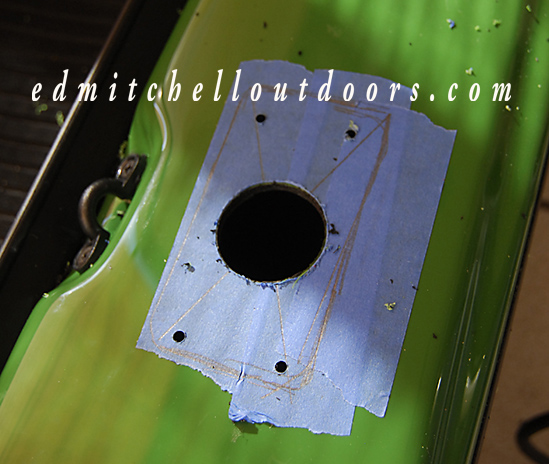
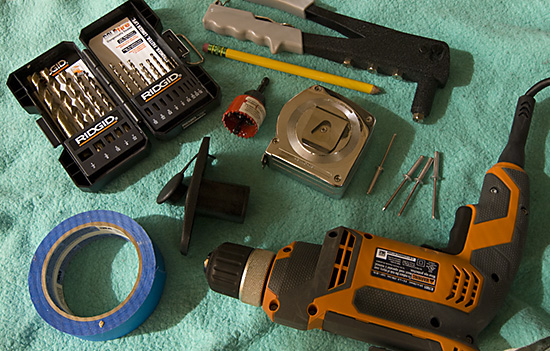
Below, you’ll see the tools I used to install this mount. They included a 3/8″ drill with drill bits, including an 1 3/8″ hole saw. A rivet tool, with rivets. Painter’s tape. A measuring tape, and a pencil.

The rivets are 3/16″.  Note that the body of the rivet (thick diameter portion) must be long enough to sandwich the mount and the deck. My rivets have a body length of 1″. Anything less than 3/4″ is probably cutting it close.

The Tools Needed

The Tools Needed to install a Scotty Flush Mount

Posted in Diablo Adios & Chupacabra, Gear | Leave a comment

Chinook have Choppers

My friend Phil is in northern California right now. Recently he sent me some pictures of dead salmon he saw along a stream. I never realized Chinook had such wicked choppers? They look as bad as bluefish.

Photo by Phil Farnsworth

Chinook Salmon have Choppers Photo by Phil Farnsworth

Posted in On the Road | Leave a comment