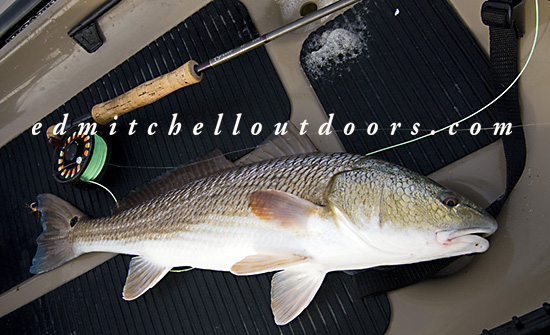
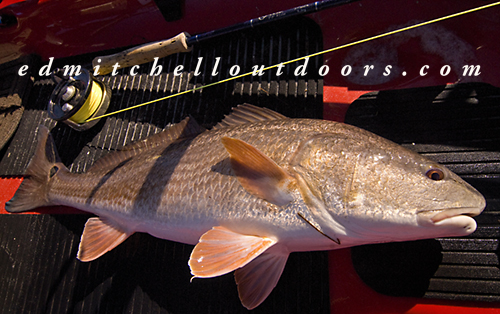
Diablo Deck Review: Part Three

Diablo Deck Review: Part Three Okay, lets move on with the project. In the previous post, I mentioned making a plywood platform for the top of the Rigid Pro Box. Well, here’s how it worked out. From a half sheet of 1/2″ plywood I cut two pieces. One 10.25″ x 22″. And one 14″ x22″. The smaller of the two fits neatly inside the 4 feet on the bottom of the Rigid Box. See photo below. (The red arrows point out the feet I’m referring to.)

Diablo Deck Review: Part Three

This first piece of ply provides a way to better support my weight across the bottom of the box. It also provides a sturdy base to which I can attach the other plywood piece. Could I have simply gone with just the bottom piece of ply? Probably. I think it would work. But that would give me only a 10.25″ wide platform for my size 13 feet. Not that great. Frankly I wanted more room to plant myself. Placing the larger piece of wood on top will give me a full 14″ width. See the photo below.

Diablo Deck Review: Part Three

After properly aligning the two boards, I drilled six 1/4″ holes through both. I plan to use 1/4 x 20 stainless steel bolts in all six. These bolts will eventual secure both pieces of ply to the box itself. Before going any further, however, I decided to bond the two ply pieces together using exterior grade wood glue. The photo below shows the boards being glued.

Diablo Deck: Part Three.

After the glue set up. I trimmed the corners off the top board. They were apt to snag clothing or waders. We don’t need that going on. Then I countersunk the bolt holes and sanded the whole deal. Next came three coats of polyurethane. May do another. Man, its looking pretty good! See below. We’ll be taking her to the water soon!

Getting Close Now!

Posted in Diablo Adios & Chupacabra, Gear | Leave a comment

Diablo Deck Review: Part Two

Diablo Deck Review: Part Two  In the previous post, I showed you a “Diablo Deck” I purchased from Diablo Paddlesports. When you stand, the “Deck” alone raises you roughly 4″ above the cockpit floor. Of course, to better spot fish we want to be much higher than that. Now the Diablo Paddlesports site shows us one solution. They suggest we attach a Yeti Cooler to the “Deck”. For example a Yeti 35 quart cooler strapped to the “Deck” would raise you an additional 15″. Great! But that cooler costs a pile of moola – $300, plus shipping and tax. Ouch. Not on my budget.

While wandering around Home Depot I found a cost effective alternative. It is a sturdy plastic tool carrier from Rigid. (I think it is called the Rigid Pro Box) Price? Not too bad -20 bucks. The box measures 13″ wide, by 22″ long, by 10″ high. It weights just over 4 pounds, and has folding handles on both ends. Flipping it over, I dropped it on the floor, and stood on it. It held my 215 pounds reasonably well. Nice. Took it home.

Diablo Deck Review: Part Two

Here’s how it looks atop the “Deck” on my Adios. Not bad. It fit the space well. And the yes, the box’s handles make it a snap to secure to the “Deck”.  So far so good.

Rigid Box on the “Deck”

Now there were two small issue to address: The bottom of the box is uneven. Second, the dead center of the bottom was softer than I liked. To solve both, I went back and bought a 2’x4′ sheet of 1/2″ one side finished plywood. Cost $15.  My plan is to fashion a flatter, and stronger platform. Below you see my lines marked out. In the next post you’ll see the results.

Plywood for a Better Platform

Before we move on, I should point out a modification I made. Not only does the “Deck” cover both 6″ rear hatches, it covered up a Scotty Flush mount I had installed sometime ago. Not wanting to lose that mount, I notched the “Deck” to accommodate it. Easy to do. See below.

Diablo Deck notched for Scotty Mount

Scotty Mount notched into the “Deck”


Posted in Diablo Adios & Chupacabra, Gear, Uncategorized | Leave a comment

Diablo Deck Review: Part One

Diablo Deck Review: Part One: For sometime now, I’ve been thinking about adding a Diablo Deck to my Adios. Why? I mainly fish flats. That means I’m “poling” most of the time. ( DYI push pole) Not only is “poling” far quieter, and more maneuverable, when standing up my ability to see fish is greatly improved. And the Diablo Deck would raise my eyes even higher off the water. Damn, I need every advantage I can get!

Diablo Deck Review: Part One

Well, I finally rang up Diablo Paddlesports and bought the Diablo Deck. So lets take a preliminary look. (In future posts will address the “Deck’s” on the water performance.) The “Deck” measures 32″ x 23-3/4″. It is 1/2″ thick and made of a hard plastic base with black foam traction material on top. (Appears to be the same foam that comes standard in the Adios cockpit.) To my eye, overall the product seems well-made. It weights about 8 pounds, and is secured to the Adios by 2 belts. These are positioned to take advantage of existing anchor points on the kayak. So there is no need to drill any new holes. In fact no tools are required. (Needle-nose pliers would be handy to pull the belts through the anchors.) Easy install.

In the above photo, note the small red arrows. I added them to show 2 anchor points on the “Deck’s” upper surface.  These are ready for you to lash down a cooler or other device  of your choosing. (The Diablo website shows a Yeti cooler installed) Yes, both anchor points are very low and small. Ummmm. Perhaps that’s to avoid them being a tripping hazard. Not sure.

Diablo Deck Review:Part One

This next photograph shows the underside of the “Deck”. Here there are 4 thick foam blocks. These are cut to the correct height so as to transfer your weight down into the Adios’ cockpit. If you look closely you’ll also see 4  silver nuts that hold down the cooler anchor points. I’ll likely swapped these out for longer screws and washers.

If you regularly use the Adios’ 2 6″ round dry access hatches, here’s a warning. The “Deck” covers both, making them unusable. And it also covers both cup holders as well. C’est la vie my friend.

Okay, I bet you’re wondering whether I’ll buy that big Yeti cooler and lash it to the “Deck’? Man, them Yetis are expensive! Frankly I’m holding off on that, at least for the moment. Perhaps I’ll find a cheaper solution. We’ll see.

Posted in Diablo Adios & Chupacabra, Gear | Leave a comment

How Many Spots does a Redfish Have?

How many spots does a redfish have? Fair question. Typically a redfish has one spot per side. It is usually located on the rear flank, near or on the tail, and above the lateral line.  The photograph below shows how that commonly looks. (In theory, this spot is a false-eye, there to confuse predators. Clever that.)

How Many Spots does a Redfish have?

Now redfish do vary. Can a redfish have no spots at all? Zero, zilch? Yes. I have seen at least one red like that. Is it possible for a redfish to have multiple spots? Yes again. Two spots is not unusual. A redfish with three spots, however, like the one in the photo below, is a bit rarer. (By the way, the spots on one flank may not be the same as the spots on the opposite flank.)

How many spots does a redfish have?

Wow check out the redfish below. It was caught by my friend Dave. It has oodles and oodles of  spots. Some of which are below the lateral line. Now we getting up there.


You’re chances of seeing a redfish with this many is probably right up there with winning the lottery. But that does beg the question: what is the maximum number of spots ever recorded? Well, I did some checking on the old inter-web and discovered much to my surprise that redfish have been caught with 50 or more spots! In fact the world record is 500 spots. Wow!   {See recent update}


Posted in Fly Fishing in Salt Water | 6 Comments

Caught the Same Redfish Twice

In the previous post, I described catching a “tailing” redfish, my first red of 2017. Naturally I returned to the same spot, paddling my Adios out the following morning with high hopes. Sure enough, a “tail” popped up, immediately. I cast to it and bingo hooked a red. Nice. Upon landed it, I realized I may have caught the same redfish twice!

Caught the Same Redfish Twice

That’s right – same location, same fly, same redfish the following day.  Yes, the fish looks slightly different here, but perhaps that camera angle and lighting. Is it the same red? Not totally sure. Well if it is that does show that catch-and-release works; still everyone knows that. But it also shows that game fish are creatures of habit, often returning to locations where they were previously successful.  (I guess we anglers are too.)

Years ago when I fished the beaches of New England, I kept a log of my striped bass adventures. I noted – day of the year, time of day, the tide, the moon phase, and the weather conditions – included wind direction, temperature, sun, rain and so on.  Those logs proved invaluable. At the start of every season, I would read through them and make plans for the months ahead. Met a lot of stripers that way.

Posted in Fly Fishing in Salt Water | Leave a comment